how to: '14+ 11.5" pinion seal

Member Builds How-To's
cb1987
50_Posts
50_Posts
Posts: 236
Joined: Sun Feb 12, 2017 8:46 pm
Model Year: 2014

how to: '14+ 11.5" pinion seal

Post by cb1987 » Sun Jun 25, 2017 7:49 pm

figured someone in the future could find use in this. quick run down on my story. bought a '17 and really from day one the rear pinion was leaking. the reason I didn't go to the dealer is because I know nothing about the competency of the 'tech' who would be doing the job. rather than roll the dice and hope they do it right I just decided to do it myself. ask 10 people how to do it and youll probly get 10 answers but ill explain how I did it and the tools I used. some tools I already had and some I bought used from ebay at discount price. really the only thing I bought brandnew was the inlb dial torq wrench and '17 FSM.

most important thing is safety. if the truck falls on you your done. I used wood blocks on both sides of the housing and some under the diff so there was zero chance of a accident. cheesy jack stands from auto zone aren't recommended by me

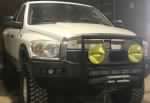
I had wiped the oil off several times over the last month but you can see the oil just from about 50mi worth of driving
20170623_094439.jpeg
some of the tools I used. a couple things I used that aren't pictured is a Y shaped puller I think its for steering wheels or harmonic balancer or something. also a small and large screwdriver
20170622_173352.jpeg
mark the driveline and flange
20170623_094412.jpeg
tie up driveline out of the way
20170623_100330.jpeg
not sure it matters but I marked the axle shafts as well. then pulled them out
20170623_100629.jpeg
20170623_121642.jpeg
marked the pinion and flange then check rotational torq. 27inlb is what I got with/ without the housing full of oil. obviously if the oil was super cold it may have skewed the numbers a bit
20170623_102030.jpeg
20170623_125159.jpeg
remove nut, I counted the turns as well. its on tight and a mother to break loose. 3/4" breaker bar and cheater is what it took
20170623_142813.jpeg
remove flange. heres where I used the Y shape puller underneath the flange holder and some 4" bolts from hardware store
20170623_145606.jpeg
flange off. the leak wasn't around the pinion shaft as it was dry as could be. appears it was leaking where the metal and rubber is fused together and possibly the metal outer edge of the seal at the housing bore. defective seal is all I can think of. factory install looked ok from what I could tell
20170623_151058.jpeg
seal removed. around the outer lip i got it started out with a small screwdriver then used larger one. do not bung up the housing surface in the prying process
20170623_155258.jpeg

cb1987
50_Posts
50_Posts
Posts: 236
Joined: Sun Feb 12, 2017 8:46 pm
Model Year: 2014

Re: how to: '14+ 11.5" pinion seal

Post by cb1987 » Sun Jun 25, 2017 7:52 pm

new seal back in (and black rtv on pinion splines and outer metal edge of seal) with miller seal driver tool 2018900030, handle 4171 I think was the number or something like that. seal driver for '13 and previous 11.5" is a lot smaller and wont work. fyi
20170623_163700.jpeg
grease seal and flange where it slides into seal. use some type of sealer on the flange splines. then slide it onto the pinion. add Loctite to threads. install washer and nut and tighten so all marks line up.
20170623_191031.jpeg
recheck rotating torq once again to confirm its nearly the same as before. 27-28inlb is what I got. close enough for me


install axle shafts with new gaskets. FSM says 30ftlb plus 37*. chiltons says 95ftlb. they both equal about the same from what I could tell
20170623_204552.jpeg
install driveline onto pinion flange so marks line up and torq bolts. youll need a 15mm torq adapter here
Last edited by cb1987 on Sun Jun 25, 2017 8:04 pm, edited 1 time in total.

Colibri
1000_Posts
1000_Posts
Posts: 1713
Joined: Mon Jun 08, 2015 5:44 pm
Model Year: 2009

Re: how to: '14+ 11.5" pinion seal

Post by Colibri » Sun Jun 25, 2017 7:58 pm

Nice work sir! :notworthy:
Central Texas and Houston area
2009 5.7 auto quadcab
Carli 3” coils deaver leafs 3” kings with 4 tube bypass rear and fr/rr hydro bumps
Howe steering pump and gear with hydraulic ram assist
Custom tube bumpers and white knuckle sliders
Creative fab trussed axle. rem polished and cryoed 5.13 gears with arb lockers fr/rr
Sharadon stage 2 545rfe with 3000 stall edge converter
Lots of other stuff lol

User avatar
DamageWagon
Vendor
Vendor
Posts: 2303
Joined: Tue Oct 11, 2016 1:21 am
Model Year: 2011
Location: Portland, OR
Contact:

Re: how to: '14+ 11.5" pinion seal

Post by DamageWagon » Sun Jun 25, 2017 8:01 pm

Excellent! Write-ups are very welcome!

User avatar
Bill2014
1000_Posts
1000_Posts
Posts: 1543
Joined: Fri May 09, 2014 9:03 pm
Model Year: 2014
Location: Northern NY

Re: how to: '14+ 11.5" pinion seal

Post by Bill2014 » Sun Jun 25, 2017 8:27 pm

Great pictures - great detail! :cheers:
2014 Power Wagon Laramie
Titan V5 2.5" Receiver Pintle Hook
Warn wireless winch controller
.188" DOM White Knuckle Rock Sliders
Locker Bypass & Nanny Kill Switch

Moab 2006

User avatar
Reloaderguy
2000_Posts
2000_Posts
Posts: 2193
Joined: Tue Feb 09, 2016 8:06 am
Model Year: 2016
Location: Central Oregon

Re: how to: '14+ 11.5" pinion seal

Post by Reloaderguy » Sun Jun 25, 2017 8:35 pm

Next time leave the axles in and just measure the breaking torque of the pinion nut. You leave the axles in so someone can stand on the brakes. Pinion preload is measured without the carrier because carrier preload will exceed the pinion's.

You probably did a better job than any dealer short of pulling the carrier.

cb1987
50_Posts
50_Posts
Posts: 236
Joined: Sun Feb 12, 2017 8:46 pm
Model Year: 2014

Re: how to: '14+ 11.5" pinion seal

Post by cb1987 » Sun Jun 25, 2017 9:09 pm

ive got a couple other trucks 10-20yrs old still on original pinion seals so hopefully there wont be a next time. I don't see what measuring the break away torq would accomplish, really I could care less what it is. besides, the breakway torq far exceeds any torq wrench I have access to. im guessing around 400ftlb but it may be even higher. during a seal replacement your only putting the nut back on so the rotation torq is what it was previous to nut removal, this is done with axles out and carrier in, per the FSM. this is why its critical to get the nut back to the same spot, so the bearing preload remains the same, assuming it was correct from the factory

User avatar
Reloaderguy
2000_Posts
2000_Posts
Posts: 2193
Joined: Tue Feb 09, 2016 8:06 am
Model Year: 2016
Location: Central Oregon

Re: how to: '14+ 11.5" pinion seal

Post by Reloaderguy » Sun Jun 25, 2017 9:36 pm

Unless you pull the carrier you can't accurately measure the pinion preload, by measuring the pinion nut load with the carrier in you're actually measuring the carrier preload. The breaking torque should be close to the torque on the pinion nut, you only need to get the pinion preload back to where it was when the gears were set up. The pinion nut may not necessarily line back up with your witness marks though they should be close. The marks may not line back up because you are retorquing the crush sleeve and it may take more rotation of the pinion nut to match the original torque. It's probably good enough, my comments are only to point out there were some unnecessary steps. You really don't even have to lift the truck off the ground unless you need the space.

This has come up before, there is only one way to correctly change a pinion seal. There are, however a bunch of ways to get it close. Yours is one of the more thorough jobs I've seen and you're right, you shouldn't trust the dealer.

cb1987
50_Posts
50_Posts
Posts: 236
Joined: Sun Feb 12, 2017 8:46 pm
Model Year: 2014

Re: how to: '14+ 11.5" pinion seal

Post by cb1987 » Sun Jun 25, 2017 10:08 pm

im not going to argue about this anymore. if you want to completely dismantle the differential for a seal replacement then go ahead. it does not say to do that in the FSM nor does it make sense from any perspective as far as im concearned. preload and torq to rotate go hand in hand. so if the nut is put back to where it previously was, torque to rotate will be the same as will bearing preload, regardless if carrier is in or out, as long as your rotating torq measurments were both done either with the carrier in, or out. obviously only a moron would take the torq measurement with the carrier in and try to compare that number to the torq with carrier out. if a new nut is used, like the manual suggests, you still only tighten it until rotational torq is the same as previously before the nut was removed (with axles out and carrier in), this sets the preload back to what it was before. if the nut is tightened further, preload goes up as does torq to rotate, if nut is to loose, preload is to loose, rotational torq will be low in relation to you previous measurment.

some guys say to use new crush sleeve, some don't put any reference marks, some could do the job in 30min with a impact gun. right at the beginning I said 10 people will give 10 answers how to do it. this is how I did it and could careless if its not the same as how you do it

In lamens simplest terms your just putting everything back to exactly how it was before. you've check before and after with the torq wrench, numbers are the same. preload is the same. call RAM and express your thoughts if you think its wrong, they wrote the book not me

flattire
250_Posts
250_Posts
Posts: 361
Joined: Fri Jun 08, 2012 1:22 pm

Re: how to: '14+ 11.5" pinion seal

Post by flattire » Sun Jun 25, 2017 10:19 pm

Excellent write up . Excellent advice not to trust dealer.

Leaking seals have been around since 2005. You would think they could have "fixed" this problem by now.

cb1987
50_Posts
50_Posts
Posts: 236
Joined: Sun Feb 12, 2017 8:46 pm
Model Year: 2014

Re: how to: '14+ 11.5" pinion seal

Post by cb1987 » Sun Jun 25, 2017 10:36 pm

i understand what your saying about getting just the pinion preload and rotating torq back to where its supposed to be, without the carrier causing additional drag. the crush sleeve has already been set during axle assembly so were just putting everything back to how it was. for example just the pinion torq might be 10-15inlb. with carrier it might be 20-25inlb. if you record the pinion torq with carier before and after nut install and both numbers are the same, i dont see how theres a problem.

User avatar
Reloaderguy
2000_Posts
2000_Posts
Posts: 2193
Joined: Tue Feb 09, 2016 8:06 am
Model Year: 2016
Location: Central Oregon

Re: how to: '14+ 11.5" pinion seal

Post by Reloaderguy » Sun Jun 25, 2017 11:55 pm

cb1987 wrote:im not going to argue about this anymore. if you want to completely dismantle the differential for a seal replacement then go ahead. it does not say to do that in the FSM nor does it make sense from any perspective as far as im concearned. preload and torq to rotate go hand in hand. so if the nut is put back to where it previously was, torque to rotate will be the same as will bearing preload, regardless if carrier is in or out, as long as your rotating torq measurments were both done either with the carrier in, or out. obviously only a moron would take the torq measurement with the carrier in and try to compare that number to the torq with carrier out. if a new nut is used, like the manual suggests, you still only tighten it until rotational torq is the same as previously before the nut was removed (with axles out and carrier in), this sets the preload back to what it was before. if the nut is tightened further, preload goes up as does torq to rotate, if nut is to loose, preload is to loose, rotational torq will be low in relation to you previous measurment.

some guys say to use new crush sleeve, some don't put any reference marks, some could do the job in 30min with a impact gun. right at the beginning I said 10 people will give 10 answers how to do it. this is how I did it and could careless if its not the same as how you do it

In lamens simplest terms your just putting everything back to exactly how it was before. you've check before and after with the torq wrench, numbers are the same. preload is the same. call RAM and express your thoughts if you think its wrong, they wrote the book not me
The FSM is half-assed. RAM only cares about the minimal effort/cost to get a vehicle out the door and doesn't seem to mind gambling if the vehicle comes back. If you're willing to go along with that train of thought (I have on other vehicles) then you can just skip taking out the axles and measuring preload (because you're not really measuring pinion preload). The upside is you won't need the extra tool to hold the pinion flange, you just need a large torque wrench (which you should have used to torque the pinion nut). Pinion crush sleeves deform as designed and are generally considered single use and is why you may need to torque the pinion nut past the witness mark you made. Just because your witness marks line up doesn't mean you have the same torque on the pinion. Sometimes it works...sometimes it doesn't. I recall someone posting here having a dealer replace their pinion seal multiple times, presumably using the FSM guide.

In short, have someone ride the brakes. Draw witness marks on the pinion nut. Measure torque. Replace seal. retorque to factory spec. Make sure you are close to the witness mark. If you reach the correct torque and are way off from the witness mark you'll need to replace the crush sleeve and measure pinion preload without the carrier in. The problem with reusing crush sleeves is they don't always hold the preload long term.

User avatar
nts007
2000_Posts
2000_Posts
Posts: 2284
Joined: Wed Dec 11, 2013 10:01 pm
Model Year: 2008
Location: Sask, Canada, Earth

Re: how to: '14+ 11.5" pinion seal

Post by nts007 » Mon Jun 26, 2017 12:45 am

Done lots of these in high mileage vehicles. Apply e brake. Pull drive shaft off, mark pinion nut position on flange, impact pinion nut off with crush washer and pull off yoke. Pop out seal. Clean area. Replace with new seal. Replace yoke. Tighten on nut with crush to hand tight. Then torque to mark. Then go 1/8" past mark. Replace driveshaft. Check oil level and go

Sometimes you need to add a speedy sleeve (google it)

5 vehicles including an Aam 11.5. 200k km later no issues. But if you want to do all the rest of the work by all means. The write up is excellent.
Personally I would have used warranty and made them fix it over and over if needed.
08 ctd--mini max--thuren 3" coils and LT Leaves--4.56 gears and lockers in pw axles--some lights--afe intake system--bd super b turbo--Banks w/m Injection--Dynatrac Balljoints--king 2.5"s--37" Hankook Dynapro MT--DOR Long arms--Custom emf track bar--Manual T-case swap--Full PW Under armor--PSC Hydro Assist and so much more

User avatar
Reloaderguy
2000_Posts
2000_Posts
Posts: 2193
Joined: Tue Feb 09, 2016 8:06 am
Model Year: 2016
Location: Central Oregon

Re: how to: '14+ 11.5" pinion seal

Post by Reloaderguy » Mon Jun 26, 2017 12:55 am

nts007 wrote:Done lots of these in high mileage vehicles. Apply e brake. Pull drive shaft off, mark pinion nut position on flange, impact pinion nut off with crush washer and pull off yoke. Pop out seal. Clean area. Replace with new seal. Replace yoke. Tighten on nut with crush to hand tight. Then torque to mark. Then go 1/8" past mark. Replace driveshaft. Check oil level and go

Sometimes you need to add a speedy sleeve (google it)

5 vehicles including an Aam 11.5. 200k km later no issues. But if you want to do all the rest of the work by all means. The write up is excellent.
Personally I would have used warranty and made them fix it over and over if needed.
Exackery

cb1987
50_Posts
50_Posts
Posts: 236
Joined: Sun Feb 12, 2017 8:46 pm
Model Year: 2014

Re: how to: '14+ 11.5" pinion seal

Post by cb1987 » Mon Jun 26, 2017 2:02 am

fellers my apologies it turned into a spooge fest. i guess a complete disassembly of the differential is the only correct way, reloaderguys exact words in another thread and now he hints at replacing the crush sleeve as well

nts007. truck is brandnew, surely 1/8 past the mark would be a disaster ? going to the dealer over and over isnt something i have time for. trust me, if the pinion shoots out like torpedo you guys will be first to know, but im puttin my money on that ill never have to go back into that differential in my lifetime. haha . take care its late i better get to sleep

User avatar
Reloaderguy
2000_Posts
2000_Posts
Posts: 2193
Joined: Tue Feb 09, 2016 8:06 am
Model Year: 2016
Location: Central Oregon

Re: how to: '14+ 11.5" pinion seal

Post by Reloaderguy » Mon Jun 26, 2017 8:32 am

What torque weight did you retorque the pinion nut to?

flattire
250_Posts
250_Posts
Posts: 361
Joined: Fri Jun 08, 2012 1:22 pm

Re: how to: '14+ 11.5" pinion seal

Post by flattire » Mon Jun 26, 2017 11:34 am

Leak is fixed.

Torque ....."just the right amount".

:cheers:


Colibri
1000_Posts
1000_Posts
Posts: 1713
Joined: Mon Jun 08, 2015 5:44 pm
Model Year: 2009

Re: how to: '14+ 11.5" pinion seal

Post by Colibri » Mon Jun 26, 2017 1:56 pm

I thought that was how you said "virgin" in deutsch
Central Texas and Houston area
2009 5.7 auto quadcab
Carli 3” coils deaver leafs 3” kings with 4 tube bypass rear and fr/rr hydro bumps
Howe steering pump and gear with hydraulic ram assist
Custom tube bumpers and white knuckle sliders
Creative fab trussed axle. rem polished and cryoed 5.13 gears with arb lockers fr/rr
Sharadon stage 2 545rfe with 3000 stall edge converter
Lots of other stuff lol

User avatar
coder
1000_Posts
1000_Posts
Posts: 1347
Joined: Wed Jun 06, 2012 5:18 pm
Model Year: 2007
Location: Trabuco Canyon, CA

Re: how to: '14+ 11.5" pinion seal

Post by coder » Mon Jun 26, 2017 6:47 pm

I admire your tenacity in tackleing this repair, but you may have just voided the warranty on your rear axle, I would have gone to the dealer and made them keep fixing it until it was right or give you a new axle if they couldn't. You paid for that warrenty in the cost of the truck why now use it.
Vehicle: 2007 Power Wagon Quad Cab - Factory Options (Inferno Red, Premium Cloth Bench Seat, Light Group, Automatic Transmission, Leather Steering Wheel)
Suspension: Carli 3" Hemi Coils, Carli Control Arms, Carli King 2.5 Pin-Tops, Carli Stainless Steering Stabilizer, Carli Trackbar | Synergy 1" Rear Shackle
Performance: Magnaflow Muffler | Magnaflow Y-Pipe
Wheels/Tires: Yokohama X-A/T 35x12.5x17
Steering/Drivetrain/Axles: Carli Front Diff Guard | Dynatrac Ball Joints | Mopar HD Steering Gear
Miscellaneous: Line-X Bedliner | Locker Bypass Switch | Mopar Rock Rails | Odyssey Extreme 65-PC1750T | Performance Friction Brake Pads | Weathertech Digital Fit Mats | Winch Thermal Protection Bypass

User avatar
OffroadTreks
Moderator
Moderator
Posts: 2409
Joined: Fri Mar 25, 2016 11:23 am
Model Year: 2015
Location: USA
Contact:

Re: how to: '14+ 11.5" pinion seal

Post by OffroadTreks » Mon Jun 26, 2017 6:49 pm

coder wrote:I admire your tenacity in tackleing this repair, but you may have just voided the warranty on your rear axle, I would have gone to the dealer and made them keep fixing it until it was right or give you a new axle if they couldn't. You paid for that warrenty in the cost of the truck why now use it.
I wondered this too. Especially with how people cling to their warranties. If there are any other failures, they'll have cause to deny you now.
2015 Power Wagon Laramie - "ROCKLANDER"
-------
[Build Thread] [Instagram] [Youtube]
------
Full-Size Off-Road Events & Overland Adventures

User avatar
Reloaderguy
2000_Posts
2000_Posts
Posts: 2193
Joined: Tue Feb 09, 2016 8:06 am
Model Year: 2016
Location: Central Oregon

Re: how to: '14+ 11.5" pinion seal

Post by Reloaderguy » Mon Jun 26, 2017 8:10 pm

MikeKey wrote:
coder wrote:I admire your tenacity in tackleing this repair, but you may have just voided the warranty on your rear axle, I would have gone to the dealer and made them keep fixing it until it was right or give you a new axle if they couldn't. You paid for that warrenty in the cost of the truck why now use it.
I wondered this too. Especially with how people cling to their warranties. If there are any other failures, they'll have cause to deny you now.
But he used the FSM! :lol:

User avatar
olyelr
2000_Posts
2000_Posts
Posts: 3658
Joined: Sun Dec 07, 2014 9:00 pm
Model Year: 2016
Location: Kewadin, MI

Re: how to: '14+ 11.5" pinion seal

Post by olyelr » Mon Jun 26, 2017 10:43 pm

If they can even prove he did anything to it.
2016 Ram Power Wagon Laramie - Granite Crystal Metallic - Ramboxes - 35” AT3W - TazerRAM

:patriot:

User avatar
nts007
2000_Posts
2000_Posts
Posts: 2284
Joined: Wed Dec 11, 2013 10:01 pm
Model Year: 2008
Location: Sask, Canada, Earth

Re: how to: '14+ 11.5" pinion seal

Post by nts007 » Mon Jun 26, 2017 11:09 pm

cb1987 wrote:fellers my apologies it turned into a spooge fest. i guess a complete disassembly of the differential is the only correct way, reloaderguys exact words in another thread and now he hints at replacing the crush sleeve as well

nts007. truck is brandnew, surely 1/8 past the mark would be a disaster ? going to the dealer over and over isnt something i have time for. trust me, if the pinion shoots out like torpedo you guys will be first to know, but im puttin my money on that ill never have to go back into that differential in my lifetime. haha . take care its late i better get to sleep
You'd think and I asked that same question. But this method is exactly how a Chrysler mechanic (not tech) of 30 years did it with me and it's also the way an experienced (tech) would do it. Somehow that 1/8" over gets you within the 95% accurate spec. The fsm reads +/- 8ft-lbs according to the "tech". Hes a good friend of mine and the only person I let touch my truck by choice. He no longer works for Chrysler dealer as he hates the monkeys with wrenches and won't put up with what the dealer forces them to do as far as upselling and other bullshit. Now he's lead mechanic at a john deer dealership. You think we got problems when an axle is outta spec. How about $35k for a final drive output replacement. Or $18k for a gps drive contoller. I'd use the warranty to the bitter end. And after warranty is off do what you want. Not judging. Just my opinion. Lots of things I do to my truck before warranty is/was off. Don't blame you for not wanting to keep running back to the stealership
08 ctd--mini max--thuren 3" coils and LT Leaves--4.56 gears and lockers in pw axles--some lights--afe intake system--bd super b turbo--Banks w/m Injection--Dynatrac Balljoints--king 2.5"s--37" Hankook Dynapro MT--DOR Long arms--Custom emf track bar--Manual T-case swap--Full PW Under armor--PSC Hydro Assist and so much more

cb1987
50_Posts
50_Posts
Posts: 236
Joined: Sun Feb 12, 2017 8:46 pm
Model Year: 2014

Re: how to: '14+ 11.5" pinion seal

Post by cb1987 » Tue Jun 27, 2017 1:29 am

Reloaderguy wrote:What torque weight did you retorque the pinion nut to?
there is no torq spec on the nut. from the factory its simply tightened until end play is gone, then further tightened in small increments until the window of rotating torq is achieved, 20-25inlb. im sure your thinking of dana axles that use a bushing, they may have a torq value for the nut, as its a different setup than a crush sleeve such as aam 11.5.

going 1/8 past the marks makes no sense in my situation. im not compensating for sloppy high milage bearing wear or a old seal with no frictional drag. truck was manufacturered only 2months ago. book does say 3-5inlb greater for a seal replacement. but again, my "old" seal was virtually new

we can hash over this until the cows come home but im 100% confident in the job I did. turn it into a shit show if you want. really I don't care

Post Reply