Page 11 of 15
Re: Boogie wagon take 2
Posted: Wed Jan 25, 2017 7:39 pm
by w2dodge
Re: Boogie wagon take 2
Posted: Thu Jan 26, 2017 1:51 am
by Colibri
You're a bad influence will!!! Thanks w2!
No turbo for me, but heads and cam with long tube headers is in the works

Re: Boogie wagon take 2
Posted: Thu Jan 26, 2017 2:37 pm
by Colibri
Got the rear cross member notched for clearance at full droop and limit strap tabs burned on. Fire extinguisher mounts made up for the front seats too. Bumpers are getting powder coated today and got the switch plate for the ARB air toggles tacked up.
Re: Boogie wagon take 2
Posted: Thu Jan 26, 2017 11:09 pm
by bstefanic
Rig is looking sick man...wish I had even close to your skills.
Re: Boogie wagon take 2
Posted: Wed Feb 01, 2017 5:49 pm
by Colibri
Thank you sir!
Got the gooseneck and front driveshaft hoop done this weekend, probably going to put the bed back on tomorrow.
Re: Boogie wagon take 2
Posted: Fri Feb 03, 2017 11:57 am
by Colibri
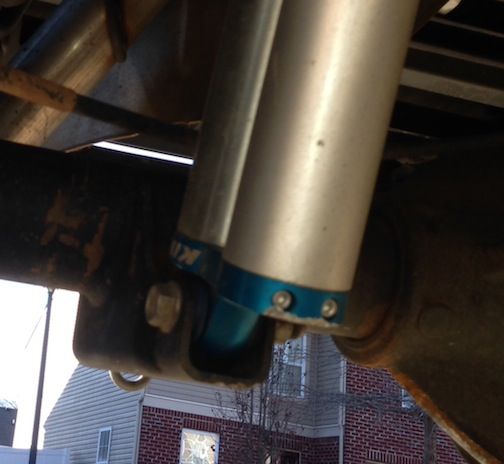
Getting the bed ready to put back on! Had to cut for the gooseneck and notch the bed cross members for clearance on the bypass shocks. Normally they're installed upside down but I wanted the shock body up out of the rocks.
Re: Boogie wagon take 2
Posted: Fri Feb 03, 2017 12:24 pm
by nts007
Let me know how it fits with the by pass shocks!! That's one of the things holding me back from those shocks. The upsidedown piggy backs too. Don't like the idea of the body on the bottom. Especially on all the gravel roads. Looking forward to installed pics!!! Looking great!
Re: Boogie wagon take 2
Posted: Fri Feb 03, 2017 5:31 pm
by Colibri
Thank you sir! Beds on and everything appears to have plenty of clearance. I'll get some under bed shots once it's in place and bolted down. Still have to make some support brackets tied to the frame for the rear transferflow toolbox/tank mounts.
Re: Boogie wagon take 2
Posted: Mon Mar 13, 2017 10:45 pm
by RAM4ROKS
AWESOME work!!!!! All around a slick build! In particular, I really like the solution on the rear shock setup, I ripped the piggyback reservoir off one of my rear Kings (and very nearly the other as well) on a particularly difficult section of trail on only the second wheeling trip after my suspension install- only three weeks after install. (ended up having to put my stock rear shocks back on and have Carli rebuild my Kings since one was broken off and the other was well on its way to being so) I have actually been running my stock rear shocks since then due to fear of tearing up the Kings again. But now, one of the stock rears is blown so, need to figure out a solution. (I should have a loooooong while (about 56k miles) ago but well... didn't, DOH!!!) I want to run them body up but couldn't come up with a good way of doing so. Your pics have shown me that way though!!!

Re: Boogie wagon take 2
Posted: Tue Mar 14, 2017 12:09 am
by DamageWagon
Morgan, just so you know you can run your rear shocks with the reservoirs over the axle instead of pointed away from the axle. That's how I run my passenger shock. Both shocks have the resi pointed to the rear of the vehicle.

Sent from my safe space
Re: Boogie wagon take 2
Posted: Tue Mar 14, 2017 9:46 pm
by RAM4ROKS
Thanks for the pic damagewagon! Unfortunately my shocks are a different design (not as cool) and will not fit in that manner. Kinda hard to tell in this pic but, it's the best I've got.
Re: Boogie wagon take 2
Posted: Tue Mar 14, 2017 10:51 pm
by Colibri
Thanks ram4rocks! Flipping the shocks isn't all that hard, and it's definitely worth it for those of us that drive by Braille lol.
Re: Boogie wagon take 2
Posted: Sun Mar 26, 2017 7:50 pm
by 2wagons1driveway
So you are running limit straps
In the rear eh Tim? I debated running them with mine as well but never ended up doing it. I think my leafs barely allow the travel my shocks can give so I figured eff it. As usual builds looking great! Can't wait to see some action videos etc
Sent from my iPhone using Tapatalk
Re: Boogie wagon take 2
Posted: Mon Jun 19, 2017 3:40 pm
by Colibri
Been a while since an update as I've been busy with other things, but finally getting around to doing some maintenance on the wagon. Repacking the front hubs with NEO synthetic HP800 and changing out the grease in my EMF rod ends to use the same redline cv2 as the carli ball joints.
Disassembled each joint and cleaned out old grease, then cleaned and reinstalled everything with fresh redline cv2. Now I can use 1 grease gun for the whole truck. Takes about 5-10 minutes working at an easy pace per rod end. Very well made stuff. Go Canada eh!
Re: Boogie wagon take 2
Posted: Fri Jun 30, 2017 4:03 pm
by Colibri
Just swapped trasfercase shifter linkage for custom coolguy unit lol
Re: Boogie wagon take 2
Posted: Sat Jul 01, 2017 1:50 am
by nts007
Excellent job!! Those joints are awesome
Re: Boogie wagon take 2
Posted: Tue Jul 18, 2017 3:42 pm
by Colibri
Thank you sir!
Changed out my master cylinder today, I was able to "bench bleed" it on the truck with a handy dandy kit I picked up on amazon. Took about 30 minutes to swap it and bleed everything. Pedal feels great now.
Also I don't think I ever posted pics of the swaybar module bracket or steering reservoir so here they are.
Re: Boogie wagon take 2
Posted: Tue Jul 18, 2017 6:26 pm
by Reloaderguy
The smart bar module enclosure is great, I need one.
Re: Boogie wagon take 2
Posted: Sat Jul 29, 2017 6:36 pm
by Colibri
Got to do a little to the truck today, finally got around to making the strapt tire carrier lockable and swapped all the different locks on the truck for BOLT locks that are keyed to the trucks ignition key. Got rid of several keys and simplified.
Also swapped out the Baja designs squadrons I've been using for fogs with some new DOT rigid D2 fogs. Going to try them out tonight and see.
Re: Boogie wagon take 2
Posted: Sat Jul 29, 2017 6:39 pm
by Colibri
More pics
Re: Boogie wagon take 2
Posted: Sat Jul 29, 2017 9:09 pm
by DamageWagon
Tim if I ever liked a third gen, yours would be my favorite

interesting switch from BD to Rigid, some might call you a blasphemer! Who made your front frame horns?
Re: Boogie wagon take 2
Posted: Sat Jul 29, 2017 10:06 pm
by Colibri
DamageWagon wrote:Tim if I ever liked a third gen, yours would be my favorite
interesting switch from BD to Rigid, some might call you a blasphemer! Who made your front frame horns?
Thanks man! It is blasphemy, but it's in the name of science lol. The bd lights are so damn bright I can't use them on the street. These d2's are street legal so I'm wanting to try them around other traffic and see if they won't blind oncoming drivers.
The frame horns are from pattonfab, they tuck in further than anything else I've seen. I had to trim a little of my winch cradle to get it even with his horns. Approach angle is vastly improved from stock.
Re: Boogie wagon take 2
Posted: Sat Jul 29, 2017 10:14 pm
by DamageWagon
Cool, let me know how the lights go. I was looking at a set of KC DOT lights until I found out about the Gucci lights the Chris's are coming up with lol.
I was talking with Pat last week, I might get a set of his horns. I did want something thicker and that mounted to the walrus teeth holes too, but I haven't been able to find anything like that.
Re: Boogie wagon take 2
Posted: Sun Jul 30, 2017 12:27 pm
by FirerescuePW
How much longer do we have to wait for the Sickest PW in the West? I only have so much patience for vicarious living!
Sent from my SM-G935P using Tapatalk
Re: Boogie wagon take 2
Posted: Sun Jul 30, 2017 9:42 pm
by TwinStick
Colibri wrote:Just swapped trasfercase shifter linkage for custom coolguy unit lol
Where did you purchase the "custom coolguy unit" ? Or did you make it yourself ?

